


Hi everyone this is a follow-up to my introduction to OpenAI thread you can view here.
I'm excited to share a new snippet containing over 50 functions that make working with OpenAI and Xano quick and easy.
You can add these functions directly to your function stack with a single click, giving your app AI powers instantly.
Account Requirement: A Xano account is necessary, available for free.
Snippet Installation: Install the Snippet on any Xano instance even our Build plan.
API Key: An OpenAI API key is required for operation. This key needs to be added as the
open_ai_api_keyenvironment variable within yourworkplace settingsafter installing the snippet. More details on where to find this here
OpenAI's API is a
pay per requestservice and can be expensive, be sure to confirm which model you are using and consult their pricing page for further details before getting started.
What's Included?
Installation
Models
Chat / Text Completions
Images
Audio
Assistants
Fine-tuning
Embeddings
Error Handling / Request Log / Troubleshooting
Included are all the available endpoints provided by OpenAI

55 Functions
1 Database (A log that records each request)
1 API Group - (Can be deleted after installation)
1 API Endpoint - (Can be deleted after installation)
1 Environment Variable - This is where you insert your OpenAI API Key
Within each category shown above are multiple endpoints or
functionsthat you can perform. These functions enable you to do things such as create images, describe what an image is, start a chat conversation, translate an audio file or url to a transcript and much more.
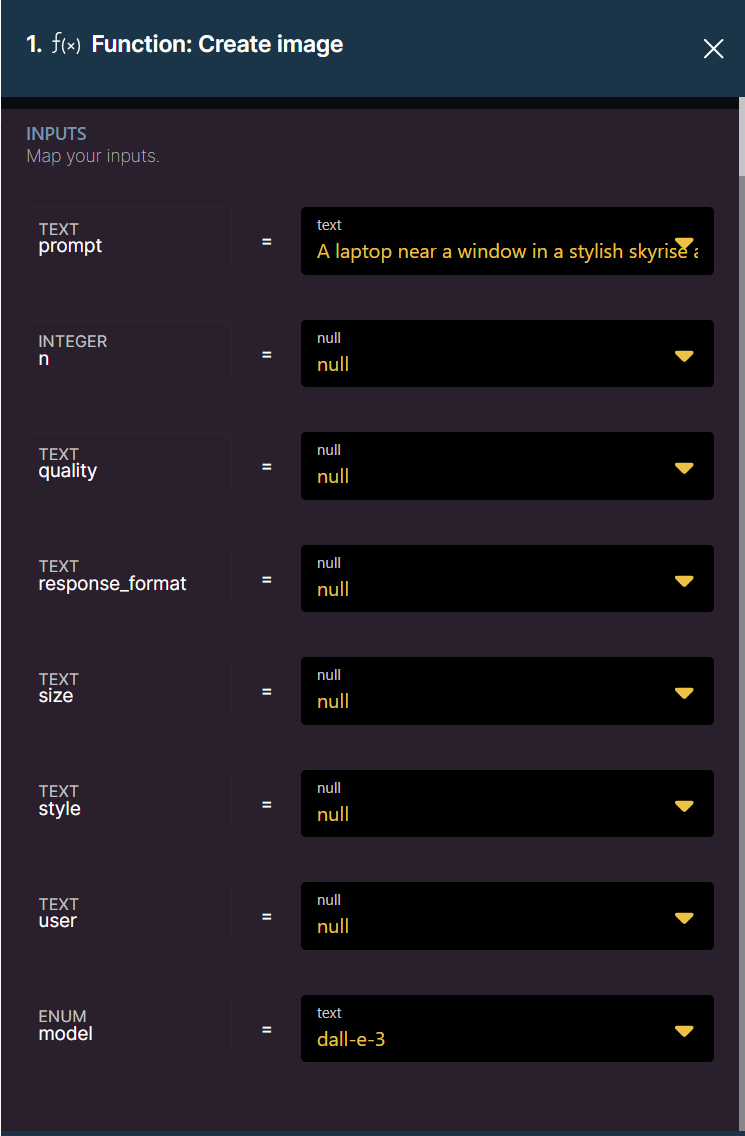
You are able to add custom functions to your function stack, for example, you might want to generate an image as part of a workflow. We can add the Create Image function to your function stack.

Within the custom function, all of the available parameters for the function are available as inputs. The only required item for this function is the Prompt and Model the other fields are optional and will default to null.
Our prompt and the only input we need to configure to get started is:
A laptop near a window in a stylish skyrise apartment with an X logo on it.
{
  "result": {
    "created": 1701235536,
    "data": [
      {
        "revised_prompt": "Visualize an image of a modern laptop situated by a large window inside a chic, high-rise apartment. The laptop should have an 'X' logo affixed to it. The window provides a panoramic view of the bustling city below. The room's decorating style is minimalist, with subtle hints of luxury. The light filtering through the window sparkles against the laptop's sleek finish, suggesting an early morning atmosphere. The scene should overall evoke a sense of modern urban living combined with technology.",
        "url": "https://oaidalleapiprodscus.blob.core.windows.net/private/org-c0vZYfhzt6L7XJqSl9ZysuSL/user-Y1hVkgcTcYOYMGP6LtyZkbw2/img-nleh0BjwQe3xZ1tvj8TWIcsR.png?st=2023-11-29T04%3A25%3A36Z&se=2023-11-29T06%3A25%3A36Z&sp=r&sv=2021-08-06&sr=b&rscd=inline&rsct=image/png&skoid=6aaadede-4fb3-4698-a8f6-684d7786b067&sktid=a48cca56-e6da-484e-a814-9c849652bcb3&skt=2023-11-29T00%3A43%3A42Z&ske=2023-11-30T00%3A43%3A42Z&sks=b&skv=2021-08-06&sig=5%2B1KyxT85ChNCBraOJslIxjWz8286H8JYgtIKkTDKDY%3D"
      }
    ]
  },
  "status": 200
}

Setting this process up takes seconds after installing the snippet making building with AI faster than ever.
To install the snippet head over to the snippet page and click install.
Sign in with your account and select which instance you would like to install the snippet to.
Then go into the instance you installed the snippet into, in the desired workspace head to the marketplace >purchased on the side menu and click install on the the OpenAI Snippet. This will add then functions, table and environment variable to your workspace.
You will then need to visit your workspace Settings and under System Variables click "Manage" and add your OpenAI API Key to the "open_ai_api_key" environment variable and save. More details on where to find your OpenAI Key here
Your AI functions are now ready to be used in your function stack, head to custom functions when adding a logic block to your function stack, or better yet type in the functions name.
Tip: You are able to search OpenAI to return all of the custom functions.
Further information about each set of functions can be found by clicking the link provided as the header of each section. This will take you to OpenAI's API reference docs for the particular function which help further explain the input parameters and their expected format.
Reading OpenAI's general documentation can also be quite helpful to further understand how the functions work: OpenAI Documentation

Models are what power OpenAI's various functions, each function can utilize various models that impact the capabilities, quality, and cost of performing a request. Custom models can also be created by fine-tuning a model with additional data.
List models - Returns a list of available models.
Retrieve model - Returns the details of a specific model.
Delete a fine-tuned model
Chat is what powers non-assistant-based text completion requests and also vision (having chatGPT describe what it sees in an image). Whether creating a conversation or asking for a single response the chat completion function is what you'd use. The function is quite extensible, for example, you can control the response_format input to determine if you'd like a response in text or json output. (JSON output is only available on the latest GPT-4 models)
Create chat completion - single message
Allows you to input one system and one user message
Create chat completion - list of messages
Accepts an array of messages
Creat message object - This is a simple function that makes creating a message object easier. You could use this function multiple times in a function stack and add each function output to the end of an array to construct the "messages" array required as an input for the Create chat completion - list of messages function.
Here's a video showing you how you can create a chatbot leveraging your Xano database to store and retrieve conversations and messages. You can replace the external api requests in the video with the Create chat completion function included in the snippet to speed up the process!

OpenAI's image generation capabilities have increased greatly with the release of their dall-e-3 model and can now produce high-definition images with intricate detail. The included functions allow you to generate new, varied, and edited images. Some of the functions included don't yet support dall-e-3, such as Create image edit
Create image - Generate one or multiple images based on the input parameters and model selected.
Create image edit - Edit an existing image
Create image variation - Create a variation of an existing image
Create Description from Image - File Upload input - Returns a description of the image (uses the Chat completions endpoint)
Create Description from Image - URL Input - Returns a description of the image (uses the Chat completions endpoint)

OpenAI have powerful audio models that allow you to both transcribe text from Audio, and convert text into Speech. These functions enable you to implement powerful audio solutions and also provides language translation capabilities as well.
Create Speech - Text to Audio - Generates audio from the input text.
Create Transcription - Audio to Text - Transcribes audio into the input language.
Create Translation - Audio to Text - Translates audio into English.
Embeddings are a fundamental concept in machine learning and natural language processing (NLP), used to convert complex, high-dimensional data like text or images into a lower-dimensional, dense vector space.
Representation: Embeddings are representations of data in a format suitable for processing. They transform raw data like words, sentences, or images into vectors of real numbers.
Dimensionality Reduction: They reduce the dimensionality of data, making it easier to handle and process, especially for machine learning algorithms.
Capture Semantics: In NLP, word embeddings capture the semantic meaning of words. Words with similar meanings are represented by vectors that are close together in the embedding space.
Contextual Relationships: Advanced embeddings (like those from BERT or GPT models) capture context and relationships between words in a sentence, not just individual word meanings.
Note you currently are only able to store vectors (embeddings) in your Xano database (This would be to keep a copy of the vector) - In order to utilize the vectors you'd need to leverage a vector database such as https://www.pinecone.io/
You could generate embeddings for your product documentation or knowledge base using OpenAI's API. Then you could store those embeddings in a vector database like Pinecone and use Xano to query the database to create a chatbot trained on your own data.
Step one generating embeddings and storing them in Pinecone

You would then be able to create a chatbot workflow that would leverage OpenAIs Embeddings and Chat Completions APIs via querying Pinecone for related information.

Generate embeddings using the function:
Create embeddings
Given an input text, outputs if the model classifies it as violating OpenAI's content policy.
Create moderation

Assistants are a powerful new tool that enable you to create custom chatbots and agents that can leverage tools, function calling and documents. This means you can upload data directly to OpenAI that your assistants can query to improve the accuracy and reliability of their responses. This technique is called Retrieval-augmented Generation (RAG). Each assistant can leverage it's own custom data, tools and instructions enabling many automation possibilities. Unlike the chat completions endpoint assistant conversations (threads ) and messages are also stored by OpenAI.
Create Assistant
This function allows you to create a new assistant. An assistant is an AI entity that can be programmed with specific skills, knowledge, and capabilities. The creation process involves defining its characteristics and the tools it can access.
Retrieve Assistant
This feature enables you to fetch details about an existing assistant. It's useful for monitoring an assistant's performance, accessing its configuration, and understanding its capabilities and limitations.
Modify Assistant
Modify Assistant is a crucial function that allows you to update the settings or capabilities of an existing assistant. This could include altering its knowledge base, changing its response style, or updating its tool access.
Delete Assistant
This function is used to permanently remove an assistant. It's an important tool for managing the lifecycle of assistants, ensuring that only relevant and necessary assistants are active.
List Assistants
List Assistants provides an overview of all the assistants created under your account. This function is essential for managing multiple assistants and understanding the scope of your AI deployment.
Create Assistant File
This function allows you to upload a specific file to an assistant. It's useful for providing the assistant with additional data or instructions that are not part of its initial programming.
Retrieve Assistant File
Retrieve Assistant File enables you to access a file previously uploaded to an assistant. This is crucial for verifying the content an assistant has access to and ensuring it's up-to-date.
Delete Assistant File
Use this function to remove a file from an assistant's database. It's vital for data management and ensuring that assistants only have access to current and relevant information.
List Assistant Files
This feature provides a list of all files associated with a particular assistant. It's an essential tool for tracking the resources your assistant has access to.
Create Thread
Initiate a new threaded conversation with an assistant. Threads are a series of messages that provide context and continuity in interactions with the assistant.
Retrieve Thread
Access a specific thread's history and details. This is crucial for reviewing past interactions and understanding the context of a conversation.
Modify Thread
This function allows you to edit the properties of an existing thread. It could be used for changing the thread's status or its associated metadata.
Delete Thread
Remove a thread permanently. This function is important for managing conversation history and ensuring privacy and data cleanliness.
Create Message
Send a new message within a thread. This function is the primary method of interacting with an assistant, allowing for questions, commands, or information exchange.
Retrieve Message
Access a specific message within a thread. It's important for reviewing the details of a conversation and understanding the assistant's responses.
Modify Message
Edit the contents or properties of an existing message. This could be used for correcting mistakes or updating information in ongoing conversations.
List Messages
View a list of all messages within a specific thread. This function provides an overview of the conversation history.
Retrieve Message File
Access a file that's been attached to a message. This is useful for reviewing documents or data exchanged in the course of a conversation.
List Message Files
See a list of all files attached to messages within a thread. This function is essential for tracking document exchanges and data references in conversations.
Create Run
Initiate a new operation or task within a thread. Runs can represent specific actions or processes that the assistant carries out in response to messages.
Retrieve Run
Access details of a specific run. This is crucial for monitoring the status and outcome of tasks assigned to the assistant.
Modify Run
Change the parameters or settings of an ongoing run. This function allows for dynamic adjustments to tasks based on new information or changing requirements.
List Runs
Get an overview of all runs associated with a thread. This is important for tracking the assistant's activities and understanding the scope of its operations.
Submit Tool Outputs
Provide feedback or results back to the assistant after a run. This is crucial for closed-loop operations where the assistant's actions require validation or further input.
Cancel Run
Terminate an ongoing run. This function is necessary for stopping tasks that are no longer needed or correcting misdirected actions.
Create Thread and Run
Start a new thread and initiate a run simultaneously. This is useful for streamlined operations where the conversation and task commencement are closely linked.
List Files
View all files stored or associated with your account. This function is critical for managing the data your assistants have access to.
Upload File
Add a new file to your account. This allows you to provide new data or resources for your assistants to use in their operations.
Delete File
Permanently remove a file from your account. This is essential for maintaining data hygiene and ensuring that only relevant and necessary files are available.
Retrieve File
Access a specific file from your account. This function is vital for reviewing the content available to your assistants.
Retrieve File Content
Extract and view the contents of a file. This is important for verifying the information your assistants are using for their tasks and responses.
Fine-tuning in machine learning refers to the process of taking a pre-trained model and further training (or "fine-tuning") it on a more specific dataset. This approach is particularly popular in contexts where a large, general-purpose model has been trained on a vast dataset and you want to adapt it to a more specific task or dataset (Like GPT 3.5 from OpenAI)
Here's a brief overview of the process:
Start with a Pre-trained Model: You begin with a model that has already been trained on a large, generic dataset. This model has learned a wide range of features and patterns relevant to its initial training task.
Select a Specific Task or Dataset: Choose a more focused task or dataset for which you want the model to perform well. This dataset is usually much smaller than the one used for initial training.
Continue Training: The pre-trained model is then further trained (fine-tuned) on this new dataset. During this phase, the model adjusts its weights and parameters to better suit the specific task.
Adjust Learning Rate: Often, a lower learning rate is used during fine-tuning to make smaller adjustments to the model's weights, preventing overfitting on the new dataset.
Evaluation and Use: After fine-tuning, the model is evaluated to ensure it performs well on the specific task. It can then be used for predictions or analysis in its new domain.
Fine-tuning is especially useful in scenarios where retrieval methods (RAG) using embeddings isn't performing acceptably due to large input context required and the cost associated with this potentially. Fine-tuning generally is considered after RAG effectiveness has been tested.
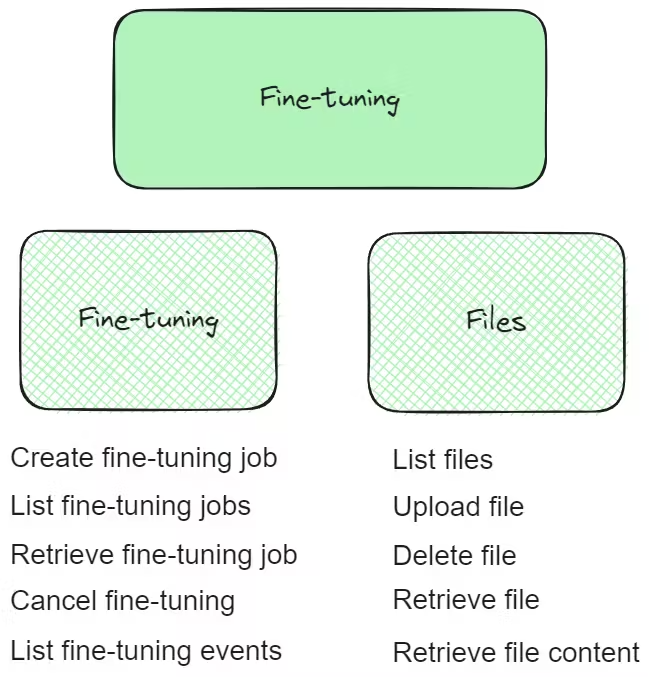
Customize AI models with fine-tuning functionalities:
Create fine-tuning job
List fine-tuning jobs
Retrieve fine-tuning job
Cancel fine-tuning
List fine-tuning events
Efficient file management through AI with functions like:
List files
Upload file
Delete file
Retrieve file
Retrieve file content
Each function containing an API request has a response with two objects:
Result & Status
Errors can be determined by both the status (not 200) and an error message appearing within the result object.
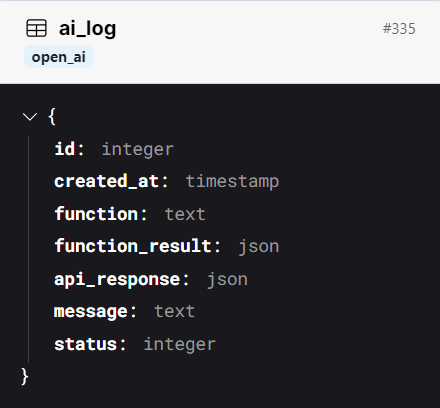
Included in the snippet is a log table that records a copy of each API request that's sent to OpenAI you are able to view these requests for troubleshooting.
There is a Create log function which adds to this table and is used in most of the functions. This can be removed from each function if you don't wish to record a copy of each request.
Further information about each set of functions can be found by clicking the link provided as the header of each section. This will take you to OpenAI's API reference docs for the particular function which help further explain the input parameters and their expected format.
Reading OpenAI's general documentation can also be quite helpful to further understand how the functions work: OpenAI Documentation
If you are having trouble using one of the functions or have a suggestion on how they could be improved please direct all of your feedback to this thread as a comment.
